Showing posts with label how to. Show all posts

Tuesday, April 14, 2015

5 Easy Faux Marble DIYs

The look of marble is very on-trend right now. Marble countertops, marble cutting boards, white marble vases and decorative bowls... it's all over the decor world. The bad part? It's expensive. And being a natural stone, it's expensive because of just that. It's hard to come by, takes a whole 'lotta resources, and it's quite the process to get it to the state that us consumers want to purchase it at. But what if I told you that you could get that marble look in some ways that won't break the budget?

I love nothing more than a good DIY thats just as useful as it is pretty. But then again, who doesn't? Well, add in the golden word of DIY's; e-a-s-y and I don't know about you but I'm sold. You don't have to tell me twice! Without any further hesitation, here are my 5 favorite faux marble DIY's.

Faux Marble Decor DIY
Faux Marble Decor DIYFaux Marble Decor DIY

Faux Marble Decor DIY

Faux Marble Decor DIY

All DIY's are featured on the links below


This post is a part of the #DefineYourHome series by Defined Designs. The series is meant to bring inspiration, knowledge, and ideas to you for getting your home in top notch shape and ready for entertaining this summer. I encourage everyone to share a space in your home or something you took home with you from this series on social media using the hashtag #DefineYourHome

Wednesday, April 8, 2015

Tips & Tricks on Tackling a Furniture Makeover

Define your home furniture makeover DIY

Hello, Hello! I'm so excited for today! Not only because we're jumping right into the #DefineYourHome series... but today I'm covering everything you need to know to tackle a furniture makeover with Jenna from Rain on a Tin Roof! If you have a DIY itch that you just can't seem to scratch, then sit right down and stay a while. Whether it's your first time taking on a furniture makeover, or you just want to know how a pro makes it look so easy - then Jenna is your girl.

Jenna writes the blog Rain on a Tin Roof and let. me. tell. you. She is wonder woman when she has a paintbrush in her hand! I had the chance to ask her a few questions and had her share her secrets so you can tackle that furniture makeover you've been thinking about with pride. Then you can head over to her blog for all of the furniture & DIY inspiration that any person can need! You can find all of her furniture makeovers here. But before we get to the Q&A, check out my favorite makeovers from Jenna:

Define your home furniture makeover DIY
1 // 2 // 3 // 4 // 5 // 6

DD: Is there a certain process you like to stick with when refinishing a piece of furniture?
        Jenna: Sand first (if needed), clean, prime (if needed), paint, top coat (if needed). See all those "if needed's"? Every piece is different. Not all pieces need sanding. If they don't, always clean the piece first. If the piece has a shiny finish, definitely prime it. Most all pieces will need to be primed unless you are using a paint that typically doesn't require priming. Paint in multiple, light coats. Don't glob it on - that will ruin your paint job! If you are painting a piece that will see a lot of use, definitely use a top coat.
Rain on a Tin Roof furniture DIY
{photo via Rain on a Tin Roof}

DD: What type of paint/ tools can you not live without when it comes to your makeover projects?
        Jenna: Last fall, I discovered the Velvet Finishes paint line and I can't say enough good things about it. It's my new go-to furniture paint. With it, most pieces don't require priming or a topcoat. I also love my electric palm sander when I have to sand a piece - it makes the process go so much faster. And on those rare occasions where I have to strip a piece of furniture, I love my heat gun. For large pieces, I will use my paint sprayer to drastically cut down on time. If I don't use my paint sprayer, I high quality paint brush is a must.

DD: If there was one product that you could recommend to a first-timer to pick up for their first project, what would it be?
        Jenna: A Velvet Finishes paint. It's next to impossible to screw up a paint job with it.
Rain on a Tin Roof furniture DIY
{photo via Rain on a Tin Roof}

DD: What are the most common problems you run into when taking on a new makeover project? How do you prepare to fix them?
        Jenna: It will always take longer than expected - always. Even though, I've done countless furniture makeovers, it never fails I always think I'll have a new one knocked out in a day or so. NEVER HAPPENS! Always allow for more time than you think. It's probably going to take more coats than you think too. Make sure you've got enough time and paint on hand. 

DD: What is your favorite furniture makeover project you've done to date?
        Jenna: Oh my word. For me, that's like asking a mother of 10 who her favorite child is! haha! If i have to choose, it would be this chair makeover. It's a simple black, white and green combination, but it's still very bold.
Rain on a Tin Roof furniture DIY
{photo via Rain on a Tin Roof}

DD: If you could give one piece of advice to a first-timer, what would it be?
        Jenna: Don't be scared! Painting furniture is probably much easier than you think! Start with a piece that you won't care to mess up and that is smaller in scale. You may just be surprised how much you rock at this furniture painting thing!


I think it's time for me to take on a new project! Do you have a piece of furniture that you've been wanting to makeover?


This post is a part of the #DefineYourHome series by Defined Designs. The series is meant to bring inspiration, knowledge, and ideas to you for getting your home in top notch shape and ready for entertaining this summer. I encourage everyone to share a space in your home or something you took home with you from this series on social media using the hashtag #DefineYourHome

Friday, April 3, 2015

Friday Favorites

DIY Easter Eggs

1 // 2 // 3 // 4 // 5 similar here // 6

One of the things that brings me back to being a kid this time of year is dying easter eggs. I always loved picking out the colors and dunking eggs in the cups just to see the pretty colors show up on the eggs. Being a naturally creative person, I can only imagine how much trouble I could have gotten myself into if Pinterest had been around back when I was deciding which crazy colors to mix and make years ago.

In honor of the Easter Bunny coming this weekend, I've gathered my favorite non-traditional easter eggs. I think I have some decorating to do this weekend!

Thursday, April 2, 2015

Tips and Tricks to Hiring a Paint Contractor

Painting your home

Happy Thursday! Did you check out the first day of the #DefineYourHome series? Since this series is all about inspiration & information on all things home, home decor, and home improvements, why not keep the series going with some tips and tricks for home improvement?! {say that 10x fast} I had the opportunity to sit down with a local painting contractor here in Charlotte, called Cardinal Pro Painters and pick their brains on everything house painting.

For those of you who just don't have the DIY skills, or maybe even the time to get up on that ladder and paint your home... this one is for you! If you aren't local to Charlotte - I've had Cardinal Pro Painters spill the beans on how to find a painting contractor and what to look for in one. If you are local to Charlotte - You're in luck! Cardinal Pro Painters has offered Defined Designs readers a 10% discount on all jobs! All you have to do is mention to your estimator that you saw this post after you have received your estimate. (Offer valid until 1/1/16 and only on jobs over $1,200.00) Offer will be applied on estimate sheet.

Check them out here!
House Painters in Charlotte
{photos via Cardinal Pro Painters}

DD: Tell us a little bit about Cardinal Pro Painters. What sets you apart from other painting contractors in Charlotte?
        Cardinal Pro Painters: Cardinal Pro Painters offers it's customers peace of mind. We are fully insured, licensed, EPA lead certified, BBB accredited, and offer our customers a written 2 year warranty. I believe that any homeowner hiring a painting contractor should ask to see these documents before starting any work on their home. We also give our customers a detailed and specific estimate outlining the prep process involved for their job, the number of coats that will be applied on all surfaces, and the type of material that will be used.

Our customers look to us for our craftsmanship, cleanliness, and professionalism. If these are the traits someone is looking for in a painting company, then the should always read online reviews from past customers and not the self-published "testimonials" on the company's own website. Unlike other painting contractors, CPP does not ask for upfront deposits to start a job. We only ask for payment after the entire job is finishes to our customer's complete satisfaction.

DD: How often should a homeowner repaint their home exterior?
        Cardinal Pro Painters: This depends on many factors. One is location. If you live near the coast, then the harsh elements (sand, salt, wind, and intense sun) will cause your paint to fade much quicker and you will likely need repainting every 2-3 years to look it's best. Here in the Carolinas, the cold winters and humid summers make paint start to look tired after about 5-6 years. Another factor is the quality of the paint used. If your house does not have much shade to protect it from the sun, then we strongly suggest going with a higher-end product to have a long lasting paint job. Finally, the labor involved makes a big difference too. Using the best paint will not do you much good if adequate surface preparation is not done to your exterior. This involves power washing, caulking, sanding down where needed, and replacing any rotted wood. Your painting contractor should be able to do all of that for you and then apply two coats of paint. Two coats is always recommended. Applying only one coat may save you some money and look fine when you put it up, but it will degrade much faster and require another paint job sooner. This will cost you more money in the long run.

DD: How long should they expect the painting process to take?
        Cardinal Pro Painters: This is a very good question to ask your painting contractor. And the answer is very different for every home. Your contractor should have the manpower needed to get the job done on your schedule and time constraints. Our crews typically consist of 3-4 painters. Full interior repaints usually last 5-6 days, and full exterior repaints usually last 3-4 days. This is considering an average size house and painting all previously painted surfaces with 2 coats. If our customers have a tighter schedule, than we will get the job done faster by using 2 (or more) crews for an additional fee.

DD: Do you provide color selections? If so, how do you go about helping a client select colors for their home?
        Cardinal Pro Painters: It is ultimately the homeowner's responsibility to choose colors as not everyone likes (or even sees) the same colors. Our estimators do bring a color book for our customers to browse through. We can suggest which colors to use on what walls and how to choose accent walls so that they can compare the colors and decide which ones they want to go with.

Cardinal Pro Painters
{photo via Cardinal Pro Painters}
DD: What should homeowners do around the house to make sure they are prepared for your company to come paint? Interior/ Exterior?
        Cardinal Pro Painters: We only ask that pets be kept away form the areas we will be working in (for their safety) and that no other contractors be working in the same area. We figure in moving a customer's furniture and wall decorations to the center of the room in our estimates.

What type of home improvements are on your spring cleaning list this year? How are you going to define your home?


This post is a part of the #DefineYourHome series by Defined Designs. The series is meant to bring inspiration, knowledge, and ideas to you for getting your home in top notch shape and ready for entertaining this summer. I encourage everyone to share a space in your home or something you took home with you from this series on social media using the hashtag #DefineYourHome

Tuesday, February 10, 2015

Galentines Day Hot Cocoa Bar


How To Valentines Day DIY Hot Cocoa Bar

Alright let's face it, the movie theater is already sold out for ALL of the valentines day showings of Fifty Shades of Grey and the only other thing that sounds appealing on the 14th of February is to spend it with your best friends chipotle, pino grigio, and the sofa.... I mean, your girlfriends.

What a better way to spend the sometimes dreaded Valentines Day holiday with all your single ladies than popping in your favorite trashy {or sappy} movie and lounging on the couch in yoga pants? What if I told you that adding a big bowl of popcorn, candy, and a MYO {make your own} hot cocoa bar would not only seal the deal with your gal pals but also be instagram worthy?! Sign. Me. Up. Am I Right? Let's dive right into the sugar coma I'm planning to have on Saturday night with my closest girlfriends, and you can too in just 5 easy steps!

Valentines Day DIY Hot Cocoa Bar

Step 1: Start with colored tissue paper or colored wrapping paper to create a table runner on your kitchen table. This will not only look cute and set the scene, but it's great for an easy cleanup!

Step 2: Fill your table by laying out your coffee mugs, apothecary jars, bowls, trays, etc. Any decorative or kitchen items that you will be using to hold your food, candy and popcorn! This will help you organize where you want everything to go first {so theres no food mess before you dig in}
Valentines Day DIY Hot Cocoa Bar

Step 3: Put your party favors or individual candy bags on a tray {shown} in a nice display. I like them near the mugs so your guests can grab one as they go and don't forget or get distracted by the MYO hot cocoa.
Valentines Day DIY Hot Cocoa Bar

Step 4: Fill your containers with all of your hot cocoa candy and ingredients {coconut, chocolate chips, peppermint, marshmellows, etc.} Don't forget to fill your largest container with popcorn! I love the look of the popcorn in a tall apothecary jar {shown} or vase! I also grabbed some small paper bags from the craft store and filled them with extra popcorn for individual portions!
Valentines Day DIY Hot Cocoa Bar

Step 5: Don't forget to set out your pretty napkins & Enjoy!

Check out a few of my favorite items below to re-create this Galentines Day Hot Cocoa Bar for your friends!

Valentines Day DIY Hot Cocoa Bar

Wednesday, January 21, 2015

5 Easy Tips for Styling Built-Ins

5 easy tips for styling shelves

Built in shelving units can be such an eye capturing featuring in a house when looking for your next home, condo or apartment. Whether they're on your 'must have' list like in house hunters on HGTV or you just happen to stumble upon them and fall in love, I'm sure we can all agree that they're pretty great. The hard part comes along when it's time to style them and it seems like a never ending job that you dread to take on. Today let's take a look through 5 tips to make styling those built-ins easy and stress free!

1. Start with a color grouping and find things with an accent color to focus on.
2. The best way to fill in the empty shelf space is with books. Start by stacking groups of books both horizontally and vertically.
3. Top stacks of books with decorative objects. Don't forget to utilize book ends, or anything metallic to bring a pop to your shelves.
4. Incorporating artwork or any variety of photo frames will take up any empty space fairly quickly. Feel free to use larger frames with small photos & a thick, fitted mat-board. 
5. Lastly, taking the time to go back through and layer the books and other objects will bring depth to your shelves and make them pleasant to look at!

Do you have built ins that are causing you a headache?? Follow the photos below for inspiration!

easy tips for styling bookshelves

Tuesday, January 6, 2015

How To: Gifting Event Tickets


This year I got my parents the ULTIMATE Christmas gift. Being a small family of three, we decided to keep Christmas simple this year and focus on spending time with each other rather than loading the tree with materialistic gifts. I stuck with my plan in not getting them gifts that will never be used, and really wanted to get them something that they would use and remember for a lifetime. And boy did I find the holy grail of gifts when Garth Brooks announced that he was bringing his tour to Boston, MA this January.

Now, my parents don't really do a lot for themselves... they're very casual, easy to please and love to have fun. They would never think to buy themselves concert tickets, but they've been known to enjoy themselves at events like Jimmy Buffet, comedy shows, and a NASCAR race or two. {Another side note: my mom LOVES Garth} The day the tickets went on sale I had an alarm on my phone set, my computer set to Ticketmaster and a phone in my hand pre-dialed. I was getting these tickets. Once I got them, my excitement burst and my mind started going in a million different directions on fun ways to gift these exciting tickets to them. Opening an envelope is easy, and where's the fun in that? I decided to grab a few small gifts that fit each of their personalities, create a riddle that they each read parts of, added in a $50 gift card for dinner before hand to make it an entire day in Boston for them, and BAM the gift turned into an experience.

It was both an experience for them to open, and will be an even better experience for them to enjoy in just a few short weeks! If you're looking to gift someone event tickets in the future, they don't have to be for the Holidays, here are my 5 tips to gifting those bad boys.


Tips to gifting event tickets:

1. Make it an experience - Add in a $50 visa gift card for dinner the night of the concert or wrap up a case of their favorite beer to bring to the tailgate for that football game. Adding something additional to go with the event tickets will make the experience of the tickets complete and show all of the thought and effort that went into the gift!
2. Make it enjoyable - Create a storyline, or a fun way to open the gift. Opening an envelope is easy, but why not have some fun with it. Write a riddle to have them guess, or use the box within a box trick {that one never gets old}
3. Make it special - Adding hand written notes or clues, even a picture of the view from their seats or some kind of print out to give them a little preview will make the whole thing that much more. {Not going to lie, my mom and I teared a little when she opened the tickets! That's how I knew it was perfect!}
4. Have a plan - Plan out how your gifts will be opened; if there are multiple gifts, write numbers on the bottom of each gifts to know the order they need to be opened. If you have a riddle, have it written in the notes on your phone so you can follow along as they read it to make sure it goes as planned!
5. Go in on it with a group - Don't be afraid to join forces with siblings, friends, or family {especially if it's a pricey gift} Splitting the cost of a gift like this would be a great way to be able to get the gift without breaking the bank!

All in all - Have fun with it!

Wednesday, December 31, 2014

5 Last Minute NYE Party Ideas


Happy New Years Eve! WOW, it's the last day of 2014 - can you believe it? Where has the time gone? I feel like just yesterday I was reminiscing on how amazing 2013 was for me and now it's time to do it all over again! Here are a few of my favorite last minute ways to ring in the new year! They're all super easy and won't take too long to pull together {so they're perfect for those of you procrastinators like me} Until next year!

1. Add some confetti to the balloons before you fill them up with helium. They make for a festive special touch and would even be fun to pop with friends and family when the clock hits midnight!

2. Top champagne glasses with fortune cookies. This is a quick and easy way to add some fun to your bubbly. Stop by your local Chinese take out and grab a handful to open after a toast to the new year!

3. Fill martini glasses with store bought cupcakes. And then tell your friends how you slaved over them for hours! Only kidding! When you're in a crunch and don't have enough time to bake up some treats, this is a great way to hide the store bought packaging and create a decorative display. {Also great for individual portions so guests can stand and mingle while indulging in sweet treats}

4. Don't forget the party hats! Spice up those plain old party hats with some sparkly scrapbook paper and some left over tinsel from the Christmas tree and you've got yourself a party. You could even set out all the paper, tinsel and other supplies and create a "make your own party hat" table if you're cutting it close on time. {tutorial included}

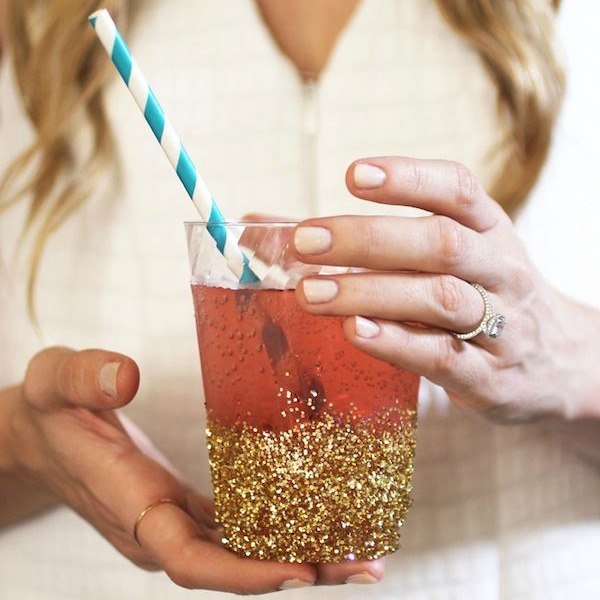
5. DIY Glitter cups. This one is probably my favorite, and it could get messy... but how cute are these and who doesn't love glitter? Grab some plain plastic party cups, some mod podge and glitter from the craft store and make sure to let them set for a few hours before you pop open the bubbly. {tutorial included}

Friday, November 7, 2014

5 Fall DIY's

easy fall DIY projects

Happy Friday! The weather is getting colder, Sundays are soon to be spent curled up on the couch watching movies with friends instead of sitting on patios enjoying the warm weather.  Let's embrace the sun setting early and the leaves falling to the ground by spending those chilly days inside doing a few DIY's. One more thing... Most of these DIY's would also make great gifts for the holidays!

1. Gold Leaf Bowls - These beauties will bring back those middle school art days with a little bit of paper mach and a whole lot of gold leaf! Great for holding jewelry!
2. Chai Candles - Hostess gifts, dinner party favors, or even just for yourself around the house.. bring that Starbucks chai tea into the home this winter season!
3. Gold Initial Ornament - You cannot go wrong with a little gold leaf this season. Or a lot, your choice. Personalize your christmas tree with these pretty little things or give one as a winter house warming gift!!
4. Watercolor Mugs - These mugs. oh my. They're so easy I want to make them in stock and send one to every single one of my friends! They're soooo adorable I just can't handle them!
5. Polka Dot Napkins - I know, I know, enough with the gold. I'm sorry! But how perfect are these DIY napkins. You could also turn these into placemats for an adorable table setting that could double into New Years Eve!

Which one of these will you be gifting this year?

Tuesday, November 4, 2014

White With A Pop

In most cases, you'll find yourself stuck with stark white walls if you are living in an apartment or a rental property. Rental communities and landlords always seem to stick with the basic and bland "builders white" paint colors for every room. Which brings up the age old question... What do you do with the white walls? How do you make them look pretty? Growing up I always wanted crazy colors for my room. Since then, I've learned to love the look of those stark white walls and embrace the bright and blank canvas that comes with such a space. Check out a few different spaces that might inspire you to get creative with those stark white walls!

A few things to think about when trying to bring pops of color into a white space:
  • Don't be afraid to mix wood tones & color together
  • Don't be afraid to mix multiple colors
  • Colorful Artwork is an easy way to bring color into the space
  • Add a colorful upholstery piece to brighten up the space
  • Textiles such as rugs, curtains or pillows are an easy, fool proof way to bring in color
  • Don't be afraid to layer white on white (but don't forget to still add color!)


via The Design Files

via Pinterest

via SchoolHouse

via Riches For Rags

How would you add a pop of color to your white rooms?

Tuesday, October 28, 2014

Styling a Tray with Mintwood Home {Giveaway}

how to use a tray in your home - free giveaway
Orange & Green // Blue & Yellow // Pink & Green
I'm so excited to be partnering with Mintwood Home this week to bring you ideas for using trays within your home. If you haven't heard of Mintwood Home before, I'll forgive you... They're kind of the new kids on the block. So I'm here to introduce you - and you can thank me later when you realize that you've been browsing through their website for hours and haven't actually gotten anything productive done... Been there, done that.

If you haven't noticed by now, I absolutely love trays. They're so versatile, come in every size and shape you can imagine and they can be used many {i mean many} ways. Most commonly known for their use on bar carts and coffee tables; they're great for holding books, remotes, and decorative objects as well as organizing your favorite liquors. The one thing most people don't think about are the other fun uses for trays.


how to use a tray in your home - free giveaway
So, You've got guests coming over for the holidays and you want to welcome them into your home in a creative way... Set a tray by the window in the guest room and display shampoo, conditioner, a candle and any other bath & beauty accessories they could use while they're there! I know my cousins and college girlfriends would love to have access to the latest Essie nail colors.

how to use a tray in your home - free giveaway
This tray would be the perfect pairing for your coffee mug on a sunday morning when you just don't want to get out of bed yet. Set it by the window with style and not just on the window sill like you would have in college... {just me?} 


how to use a tray in your home - free giveaway
With a larger tray, you've got more room to play and get creative. Set your guests up with the book you just finished, a candle, and don't forget that wifi password! How many times have you gone to someones house and asked for their password? We are in a world now where internet and social media are must haves and sometimes, you just have to embrace it. Sharing your wifi password with your guests this way adds some creativity to their stay and makes them feel right at home!

how to use a tray in your home - free giveaway
Make yourself feel like a guest in your own home and enjoy a good book, with a cup of coffee and a nice candle. All those things that might be cluttering your nightstand can make you feel pampered for an afternoon when you set them up on a tray and enjoy some time relaxing! 


Shop this Post:

A huge thanks to Mintwood Home for sponsoring this post. Enter Below for a chance to win the Canary Yellow & Cobalt Blue Ikat Tray photographed above! Giveaway ends Tuesday 11/4 and the winner will be announced on Wednesday 11/5!

Friday, October 17, 2014

6 Steps to Staging a Coffee Table

6 steps to styling a coffee table tray
Photos: Andi Perullo
I'm so excited to finally be sharing this with you all! Last week, I had the chance to hang out at the West Elm here in Charlotte and play around in the showroom styling things. To say I was like a kid in a candy shop is an understatement. Now, This {I think} is one of the easiest and most fool proof ways to decorate a coffee table to ensure it looks nicely put together. Good thing is... most of these items you may already have - but if not, they are very easy to find!

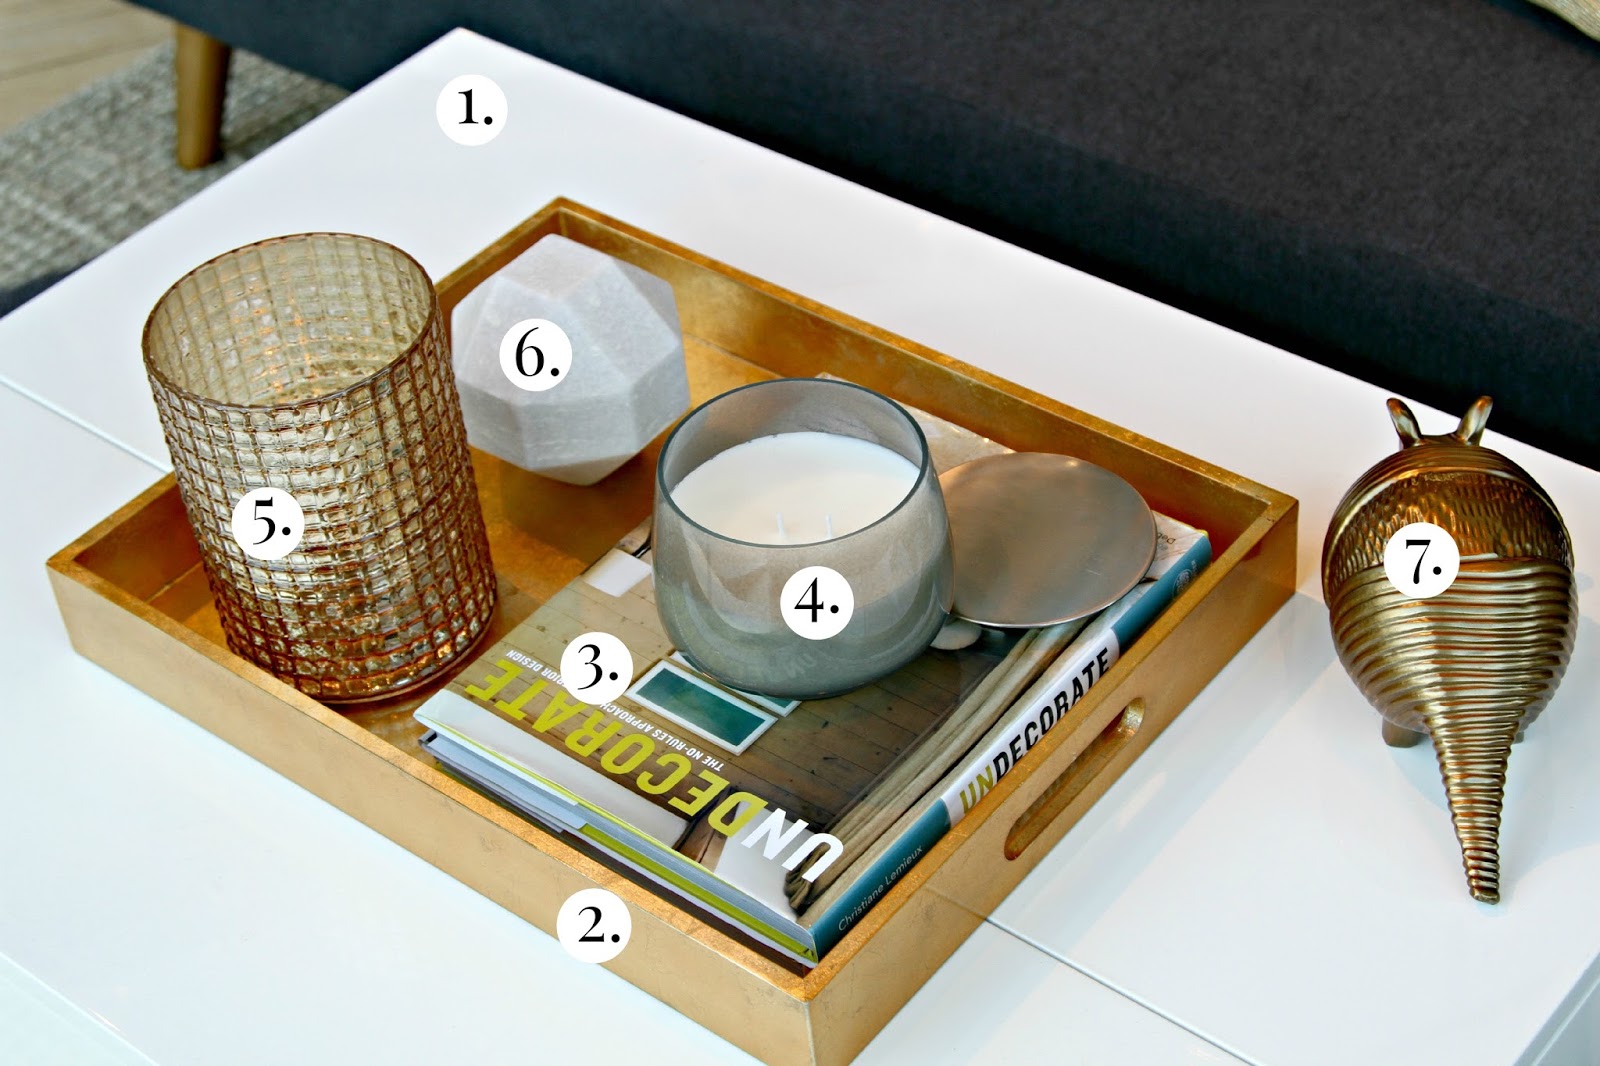
First things first, You're going to need about 7 items. Why am I calling it the 6 Steps to styling a coffee table?? Well, that's simply because I'm going to assume most of you already have #1 covered. Whether it's grandmas old wooden coffee table, or it's this storage friendly coffee table from West Elm {pictured} Any coffee table will do!

1. Coffee Table: West Elm {similar}
2. Tray: West Elm {similar, similar, similar}
3. Stack of Books: {see here}
4. Candle: West Elm {love these}
5. Vase or Candle Hurricane: West Elm {love these}
6. Decorative Item: West Elm {love these}
7. Decorative Item: West Elm {Rhino, Reindeer}
6 steps to styling a coffee table tray


6 steps to styling a coffee table tray
Start with the tray, place it smack dab in the center of the coffee table.

6 steps to styling a coffee table tray
Add your stack of coffee table books or magazines to one side of the tray.

6 steps to styling a coffee table tray
Top your stack of books with your favorite candle. Feel free to take the top off for added flair.

6 steps to styling a coffee table tray
Place your hurricane or vase in the back corner of the open side of the tray. Making sure your vase is just a little bit taller than where the candle sits is key to create a landscape within your tray.

6 steps to styling a coffee table tray
Huge thanks to West Elm Charlotte for having me!
Add your smallest decorative object in front of the hurricane. Add an extra decorative object on the edge of your coffee table to give the eyes a path on and off the coffee table. This armadillo was my favorite little object in the store, I just had to include it! Brass animals are so popular and trendy right now, check out this rhino or these reindeer.


What's the verdict? Seems easy enough, right?? Do you think you can pull something like this off?