Showing posts with label Hosting Parties. Show all posts

Tuesday, February 10, 2015

Galentines Day Hot Cocoa Bar


How To Valentines Day DIY Hot Cocoa Bar

Alright let's face it, the movie theater is already sold out for ALL of the valentines day showings of Fifty Shades of Grey and the only other thing that sounds appealing on the 14th of February is to spend it with your best friends chipotle, pino grigio, and the sofa.... I mean, your girlfriends.

What a better way to spend the sometimes dreaded Valentines Day holiday with all your single ladies than popping in your favorite trashy {or sappy} movie and lounging on the couch in yoga pants? What if I told you that adding a big bowl of popcorn, candy, and a MYO {make your own} hot cocoa bar would not only seal the deal with your gal pals but also be instagram worthy?! Sign. Me. Up. Am I Right? Let's dive right into the sugar coma I'm planning to have on Saturday night with my closest girlfriends, and you can too in just 5 easy steps!

Valentines Day DIY Hot Cocoa Bar

Step 1: Start with colored tissue paper or colored wrapping paper to create a table runner on your kitchen table. This will not only look cute and set the scene, but it's great for an easy cleanup!

Step 2: Fill your table by laying out your coffee mugs, apothecary jars, bowls, trays, etc. Any decorative or kitchen items that you will be using to hold your food, candy and popcorn! This will help you organize where you want everything to go first {so theres no food mess before you dig in}
Valentines Day DIY Hot Cocoa Bar

Step 3: Put your party favors or individual candy bags on a tray {shown} in a nice display. I like them near the mugs so your guests can grab one as they go and don't forget or get distracted by the MYO hot cocoa.
Valentines Day DIY Hot Cocoa Bar

Step 4: Fill your containers with all of your hot cocoa candy and ingredients {coconut, chocolate chips, peppermint, marshmellows, etc.} Don't forget to fill your largest container with popcorn! I love the look of the popcorn in a tall apothecary jar {shown} or vase! I also grabbed some small paper bags from the craft store and filled them with extra popcorn for individual portions!
Valentines Day DIY Hot Cocoa Bar

Step 5: Don't forget to set out your pretty napkins & Enjoy!

Check out a few of my favorite items below to re-create this Galentines Day Hot Cocoa Bar for your friends!

Valentines Day DIY Hot Cocoa Bar

Thursday, February 5, 2015

Hosting a Bachelor Viewing Party

hosting a bachelor viewing party

Every Monday night you gather with your friends in front of the TV to binge in your favorite guilty pleasure along with every other female with a trashy tv obsession. Already know what I'm talking about? Thought so. The Bachelor/ Bachelorette on ABC is Americas favorite guilty pleasure. When we aren't drooling over the guy {farmer Chris, yes please!}, gossiping about the girl's dresses for the rose ceremony and talking about who's the most psychotic on the show, we're also crammed on the couch with a bottle of wine and a spread of food to indulge in throughout the show. {just admit it, we all do it..}

It's like the Victorias Secret Fashion show but it's even better. And I mean every Monday better.. If you're not on top of your viewing party game yet there's no need to worry. Call up your friends, make a Facebook event, start an obnoxious group text and hit the store. I see tons of baked brie, cheese platters, and fancy drinks in your future! Here's ten items you'll need to host your own fancy shmancy Bachelor/ Bachelorette viewing party:

1. Wine Glasses or Champagne Flutes - for the obvious
2. Drink Napkins - fancy or funny, your preference
3. Drink Coasters - glitter and monograms encouraged
4. Tray - fill that baby up with drinks or snacks and center it on your coffee table to start off the party
5. Snack bowls - for the munchies; chips, pretzels, crackers, etc.
6. Cheese platter/ server - you know you want some cheese with that wine...
7. Cheese Knives - for the cheese
8. Condiment & Dip Platter - hummus, salsa, spinach artichoke dip... yum
9. Serving Spoons - so the dips aren't too messy
10. Cake Stand - sweets, sugar... no one is on a diet when it's the Bachelor!


Friday, January 30, 2015

Super Bowl Sunday

super bowl sunday DIY party ideas

The big day is almost here. This weekend. Everyone is talking about it. Whether you are watching it for the tear worthy commercials, the halftime show where there's always a possibility for a wardrobe malfunction, or even if you're actually watching it for the game.. there's always food and beer that go hand in hand with the Super Bowl. Am I right? Today's Friday Favorites are featuring my favorite DIY Super Bowl party ideas.

Second, I've made a little bingo game for you all to partake in during this special occasion called the superbowl. Cause let's face it... we all watch it for the commercials. Download my Superbowl Commercial bingo cards here. What commercials are you looking forward to seeing?


1. Chalkboard Sign - A chalkboard sign would be perfect to draw football plays on and set on the food table. If you don't have a chalkboard sign, you can always print 'ready, set, eat' out on paper and put it in a picture frame! {via Catch my Party}
2. Penalty Flag Napkins - This one should be pretty self explanatory but it's a clever way to put out those napkins that will be much needed... especially if there's wings involved. {via Hostess with the Mostess}
3. Football Snack Bags - this one is really easy and a great way to decorate that food table! Brown paper lunch bags with white wash tape to create the football stitching and there you go. Fill them with chips or popcorn for individual servings. {via Hostess with the Mostess}
4. Water Break Drink Sign - You could use a sign that says "water break" on virtually anything. Water, juice, iced tea, a bucket of beer, a keg.. why not! Everyone has to stay hydrated during the Super Bowl. {via eVite}

Wednesday, December 31, 2014

5 Last Minute NYE Party Ideas


Happy New Years Eve! WOW, it's the last day of 2014 - can you believe it? Where has the time gone? I feel like just yesterday I was reminiscing on how amazing 2013 was for me and now it's time to do it all over again! Here are a few of my favorite last minute ways to ring in the new year! They're all super easy and won't take too long to pull together {so they're perfect for those of you procrastinators like me} Until next year!

1. Add some confetti to the balloons before you fill them up with helium. They make for a festive special touch and would even be fun to pop with friends and family when the clock hits midnight!

2. Top champagne glasses with fortune cookies. This is a quick and easy way to add some fun to your bubbly. Stop by your local Chinese take out and grab a handful to open after a toast to the new year!

3. Fill martini glasses with store bought cupcakes. And then tell your friends how you slaved over them for hours! Only kidding! When you're in a crunch and don't have enough time to bake up some treats, this is a great way to hide the store bought packaging and create a decorative display. {Also great for individual portions so guests can stand and mingle while indulging in sweet treats}

4. Don't forget the party hats! Spice up those plain old party hats with some sparkly scrapbook paper and some left over tinsel from the Christmas tree and you've got yourself a party. You could even set out all the paper, tinsel and other supplies and create a "make your own party hat" table if you're cutting it close on time. {tutorial included}

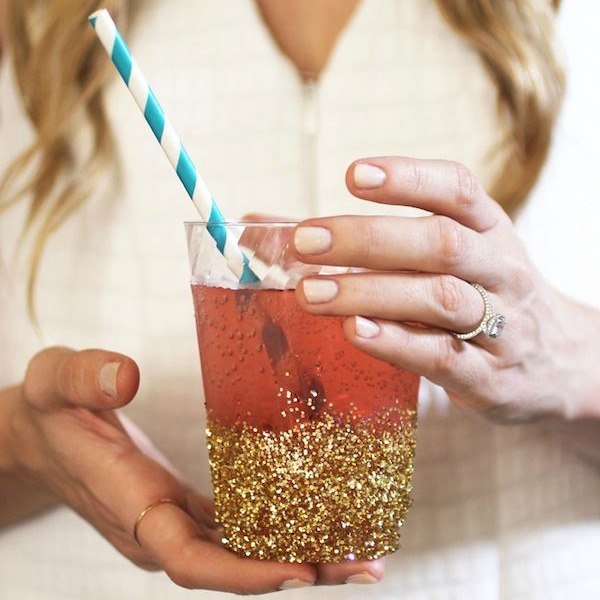
5. DIY Glitter cups. This one is probably my favorite, and it could get messy... but how cute are these and who doesn't love glitter? Grab some plain plastic party cups, some mod podge and glitter from the craft store and make sure to let them set for a few hours before you pop open the bubbly. {tutorial included}

Tuesday, November 25, 2014

Get the Look

thanksgiving table setting
via Apartment34

Who's ready for Thanksgiving!? I know I am! I'll be heading a little north to the DC area to spend this holiday with my family! I can't wait to see everyone and celebrate the time we have to spend together. Even though I'll be away from my home this holiday, I'll be dreaming of this table top in my sleep... isn't it just so perfect? I know we're getting down to the wire here on the Thanksgiving deadline but if you are a last minute guru like I am, then now is your chance! Gather your shopping list from all of the shoppable links below and head on over to your local Target & West Elm to snag up the prettiest tabletop for Thanksgiving dinner! Dress your tabletop to impress!
thanksgiving table setting items


Shop the look:


Friday, November 21, 2014

Friday Favorites


I've been obsessing over setting the table for thanksgiving and entertaining for the holidays lately... Prepare yourselves for a whole lot of entertaining posts coming up! It's acceptable because of the holiday season right? Well, tis the season so let's kick it off with some of my favorite Thanksgiving tables capes I've been seeing on Pinterest lately. And if you missed my holiday drink recipe yesterday, check it out here - You don't want to miss out on this one!

via

via

via

via

via

Thursday, November 20, 2014

Toasting the Holidays

festive holiday drink recipe

Holidays like Thanksgiving call for family & friends. And what's a better way to spend some time celebrating and being thankful for all you have than doing it while enjoying some holiday drinks? This is probably the easiest holiday drink I've ever made {besides a mimosa} but it's pretty much like a holiday mimosa which is even better! I discovered this drink at Nan & Byron's in Charlotte and I just had to know their secret! I was so surprised, but even more excited to find out just how simple it was that I could do it myself! I'll definitely be taking this recipe home for the holidays. Who's ready to pop some bubbly and get to toasting the holidays with friends and family?

What you need:
1. Your favorite Prosecco
2. Sparkling Cider {this is optional for the non-drinkers and the little ones}
3. White cran juice {i used white crane peach & it was delicious!}
4. Dried Cranberries
Bar Items:
5. Glass vase for juice
6. Tag to label the juice
7. Champagne Flutes {love these}
8. Mini Bowls for fruit & garnish {similar}
9. Spoon
10. Tray for displaying items
Check out the Bar Cart Pictured, here.
festive holiday drink recipe

Recipe:
2 parts prosecco
1 part white cran juice
Top with dried cranberries for garnish
Hint: the bubbles from the prosecco will make the cranberries dance up and down through the champagne flute creating a fun and entertaining drink for everyone to enjoy!

festive holiday drink recipe

festive holiday drink recipe

festive holiday drink recipe
Thanks to West Elm Charlotte for having me for their corporate Drink + Clink event! All products used in this post are c/o West Elm.

Friday, November 7, 2014

5 Fall DIY's

easy fall DIY projects

Happy Friday! The weather is getting colder, Sundays are soon to be spent curled up on the couch watching movies with friends instead of sitting on patios enjoying the warm weather.  Let's embrace the sun setting early and the leaves falling to the ground by spending those chilly days inside doing a few DIY's. One more thing... Most of these DIY's would also make great gifts for the holidays!

1. Gold Leaf Bowls - These beauties will bring back those middle school art days with a little bit of paper mach and a whole lot of gold leaf! Great for holding jewelry!
2. Chai Candles - Hostess gifts, dinner party favors, or even just for yourself around the house.. bring that Starbucks chai tea into the home this winter season!
3. Gold Initial Ornament - You cannot go wrong with a little gold leaf this season. Or a lot, your choice. Personalize your christmas tree with these pretty little things or give one as a winter house warming gift!!
4. Watercolor Mugs - These mugs. oh my. They're so easy I want to make them in stock and send one to every single one of my friends! They're soooo adorable I just can't handle them!
5. Polka Dot Napkins - I know, I know, enough with the gold. I'm sorry! But how perfect are these DIY napkins. You could also turn these into placemats for an adorable table setting that could double into New Years Eve!

Which one of these will you be gifting this year?

Wednesday, November 5, 2014

Set the Table

Instagram

Just in time for the holidays... mainly Thanksgiving in my book because personally, I can't wait for turkey and stuffing! The Crate & Barrel Set the Table sale is here! it's running til 11/10 so you don't want to miss out! Grab all of the items you might need to set that table and host the holidays with friends and family at 20% off select, full price items! Check out my favorite items below.

And who could pass up on these Olivia Pope wine glasses... yes, long stems and all!

Friday, August 22, 2014

Hosting & Toasting: Part 4

via Style Me Pretty
There are numerous ways you can set a table for an event. No matter what you may be hosting, when there's a will there's a way, right? To finish out this wonderful little mini series with The Blush Label, why not give you some inspiration and shopping ideas so you can bring the party into your home and be prepared to host and toast with your friends and family!

via The Perfect Palette

via Design Love Fest {includes placemat tutorial}

image

Here's are ideas for setting your table depending on whether your event is formal or informal. It's a great cheat sheet if you ask me! You'll look like a pro if you follow this!
via Alexan Events

Shop Dinnerware:


Shop Glassware:


Shop Dinner Party Extras:


And don't forget to check out The Blush Label for all of the table linens you could need! Placemats, cocktail napkins, they've got some darling patterns and colors!

Friday, August 15, 2014

Hosting & Toasting: Part 3 {DIY & WINNER}

Today is the day! One lucky person is the new owner of the prettiest placemats of their choosing from The Blush Label! The winner will be announced at the end of this post but stick around a little bit and get comfortable because the fun is not over yet. {and next week will be the final post!}

Remember that adorable flower setting in the original post featuring the placemats? {check it out here} Today's quick little DIY will show you just how to recreate that lemon floral arrangement here:

Slice up your lemons as shown.
Make sure they are all the same thickness so they will stack nicely on top of each other.

Once you have all of your lemons sliced, {I sliced 4, and left 1 whole}
Line the bottom edge with your first level of lemons.
Place the whole lemon and a few ends {if needed} in the center to hold the lemons in place.

Next, continue to stack the lemons up the inside of your vase in a brick pattern.
Once you get your second level of lemons on the inside of the vase you can pour in water.
This will cause the lemons to float! You can rearrange them if needed and begin the next step:

Begin to transfer your flowers into your vase.
You might need to switch flowers/ lemons/ flowers/ lemons.
This method will help keep the lemons from floating. You can arrange the flower stems to wedge the lemons into the side of the vase.

Finish layering your lemons up the inside of the vase.
Fix the arrangement of your flowers to make them look full & You're done! Enjoy you're beautiful blooms and this taste worthy centerpiece!


Get yourself the perfect glass vase for this DIY here:
Check out these other great vases here:

Congrats to the lucky winner!! Sad you missed out on the Giveaway fun? Check out the amazing products The Blush Label has to offer here! Also, check out last week's Hosting & Toasting post if you missed it!

Friday, August 8, 2014

Hosting & Toasting: Part 2 {DIY}


I hope everyone is as happy as I am to see Friday again! Welcome back to the Hosting & Toasting mini series! If you didn't catch the Part 1, {see here} Today's post features a very simple and easy DIY that I'm sure you've seen on Pinterest a time or two. These wine cork table settings create name tags for your guests to feel extra special at that dinner part or mimosa brunch you're hosting! And when I say easy, trust me on this one! So, crack open the wine and drink up cause we're going to need those corks for this one!

Here's what you need:

First start out by using a pencil to practice writing out each of your guests names. {my roommate and I like to drink wine, so why not use our names as an example} Once you've found the style you like, go over it with a sharpie or pen of choice and make it look like calligraphy.. {Here's a great tutorial}

Stick each named label back to back with a blank label to create your name tags.
Next, cut off the bottom of your wine corks {less than half as shown} This will help your corks stand up straight.

At the top of the cork {opposite side of the bottom you just cut off} create a slit in the top for the name tag to sit in.

Neatly place your name tags into the slit that you have created at the top. And you are complete!!


But really, how simple was that? I think the hardest easiest part will be consuming all of that wine to get your wine corks {let's hope you're not having a large guest list for dinner!} Have you tried anything similar to this for table settings and name tags?? I'd love to hear about your Hosting & Toasting DIY's!

Don't forget to enter the giveaway with The Blush Label to win a set of their beautiful placemats!! The giveaway ends next friday!!

Friday, August 1, 2014

Hosting & Toasting: Part 1 {GIVEAWAY}


Hello and Happy Friday! I'm so happy to finally be able to announce this exciting collaboration I have been working on with the girls over at The Blush Label! If you have not heard of them yet, please drop everything and go check out their website - These two sisters are amazingly talented and their shop is filled with bright and beautiful products to make your home THE best place to entertain!

For the month of August, I will be here every friday with a new post for this Hosting and Toasting mini series. When the girls at The Blush Label announced that they were releasing a new line of placemats, I couldn't help but squeal like a little girl on Christmas morning when I saw the designs they had put together! In 2 weeks, {Friday, August 15th} I will be announcing the lucky winner of a set of placemats from the Blush Label's new collection! The winner gets to choose which design they would like a set of - So don't forget to enter to win below!

What do I love so much about these placemats..? Well, besides the fact that they are the prettiest things in my kitchen currently - They are made of a cotton/linen blend {that's right, machine washable!!} And better yet, they're made right here in North Carolina! Check out how I styled these beautiful Aqua and Orange placemats for a wine night with my roommate!


Shop West Elm

Shop the Look:


Below are the 4 beautiful designs that The Blush Label is offering and the lucky winner gets to choose which design they would like! Don't forget to enter below for your chance to win a set of these! You've got 50 entries waiting for you!