Showing posts with label DIY. Show all posts

Tuesday, April 14, 2015

5 Easy Faux Marble DIYs

The look of marble is very on-trend right now. Marble countertops, marble cutting boards, white marble vases and decorative bowls... it's all over the decor world. The bad part? It's expensive. And being a natural stone, it's expensive because of just that. It's hard to come by, takes a whole 'lotta resources, and it's quite the process to get it to the state that us consumers want to purchase it at. But what if I told you that you could get that marble look in some ways that won't break the budget?

I love nothing more than a good DIY thats just as useful as it is pretty. But then again, who doesn't? Well, add in the golden word of DIY's; e-a-s-y and I don't know about you but I'm sold. You don't have to tell me twice! Without any further hesitation, here are my 5 favorite faux marble DIY's.

Faux Marble Decor DIY
Faux Marble Decor DIYFaux Marble Decor DIY

Faux Marble Decor DIY

Faux Marble Decor DIY

All DIY's are featured on the links below


This post is a part of the #DefineYourHome series by Defined Designs. The series is meant to bring inspiration, knowledge, and ideas to you for getting your home in top notch shape and ready for entertaining this summer. I encourage everyone to share a space in your home or something you took home with you from this series on social media using the hashtag #DefineYourHome

Wednesday, April 8, 2015

Tips & Tricks on Tackling a Furniture Makeover

Define your home furniture makeover DIY

Hello, Hello! I'm so excited for today! Not only because we're jumping right into the #DefineYourHome series... but today I'm covering everything you need to know to tackle a furniture makeover with Jenna from Rain on a Tin Roof! If you have a DIY itch that you just can't seem to scratch, then sit right down and stay a while. Whether it's your first time taking on a furniture makeover, or you just want to know how a pro makes it look so easy - then Jenna is your girl.

Jenna writes the blog Rain on a Tin Roof and let. me. tell. you. She is wonder woman when she has a paintbrush in her hand! I had the chance to ask her a few questions and had her share her secrets so you can tackle that furniture makeover you've been thinking about with pride. Then you can head over to her blog for all of the furniture & DIY inspiration that any person can need! You can find all of her furniture makeovers here. But before we get to the Q&A, check out my favorite makeovers from Jenna:

Define your home furniture makeover DIY
1 // 2 // 3 // 4 // 5 // 6

DD: Is there a certain process you like to stick with when refinishing a piece of furniture?
        Jenna: Sand first (if needed), clean, prime (if needed), paint, top coat (if needed). See all those "if needed's"? Every piece is different. Not all pieces need sanding. If they don't, always clean the piece first. If the piece has a shiny finish, definitely prime it. Most all pieces will need to be primed unless you are using a paint that typically doesn't require priming. Paint in multiple, light coats. Don't glob it on - that will ruin your paint job! If you are painting a piece that will see a lot of use, definitely use a top coat.
Rain on a Tin Roof furniture DIY
{photo via Rain on a Tin Roof}

DD: What type of paint/ tools can you not live without when it comes to your makeover projects?
        Jenna: Last fall, I discovered the Velvet Finishes paint line and I can't say enough good things about it. It's my new go-to furniture paint. With it, most pieces don't require priming or a topcoat. I also love my electric palm sander when I have to sand a piece - it makes the process go so much faster. And on those rare occasions where I have to strip a piece of furniture, I love my heat gun. For large pieces, I will use my paint sprayer to drastically cut down on time. If I don't use my paint sprayer, I high quality paint brush is a must.

DD: If there was one product that you could recommend to a first-timer to pick up for their first project, what would it be?
        Jenna: A Velvet Finishes paint. It's next to impossible to screw up a paint job with it.
Rain on a Tin Roof furniture DIY
{photo via Rain on a Tin Roof}

DD: What are the most common problems you run into when taking on a new makeover project? How do you prepare to fix them?
        Jenna: It will always take longer than expected - always. Even though, I've done countless furniture makeovers, it never fails I always think I'll have a new one knocked out in a day or so. NEVER HAPPENS! Always allow for more time than you think. It's probably going to take more coats than you think too. Make sure you've got enough time and paint on hand. 

DD: What is your favorite furniture makeover project you've done to date?
        Jenna: Oh my word. For me, that's like asking a mother of 10 who her favorite child is! haha! If i have to choose, it would be this chair makeover. It's a simple black, white and green combination, but it's still very bold.
Rain on a Tin Roof furniture DIY
{photo via Rain on a Tin Roof}

DD: If you could give one piece of advice to a first-timer, what would it be?
        Jenna: Don't be scared! Painting furniture is probably much easier than you think! Start with a piece that you won't care to mess up and that is smaller in scale. You may just be surprised how much you rock at this furniture painting thing!


I think it's time for me to take on a new project! Do you have a piece of furniture that you've been wanting to makeover?


This post is a part of the #DefineYourHome series by Defined Designs. The series is meant to bring inspiration, knowledge, and ideas to you for getting your home in top notch shape and ready for entertaining this summer. I encourage everyone to share a space in your home or something you took home with you from this series on social media using the hashtag #DefineYourHome

Friday, April 3, 2015

Friday Favorites

DIY Easter Eggs

1 // 2 // 3 // 4 // 5 similar here // 6

One of the things that brings me back to being a kid this time of year is dying easter eggs. I always loved picking out the colors and dunking eggs in the cups just to see the pretty colors show up on the eggs. Being a naturally creative person, I can only imagine how much trouble I could have gotten myself into if Pinterest had been around back when I was deciding which crazy colors to mix and make years ago.

In honor of the Easter Bunny coming this weekend, I've gathered my favorite non-traditional easter eggs. I think I have some decorating to do this weekend!

Tuesday, February 10, 2015

Galentines Day Hot Cocoa Bar


How To Valentines Day DIY Hot Cocoa Bar

Alright let's face it, the movie theater is already sold out for ALL of the valentines day showings of Fifty Shades of Grey and the only other thing that sounds appealing on the 14th of February is to spend it with your best friends chipotle, pino grigio, and the sofa.... I mean, your girlfriends.

What a better way to spend the sometimes dreaded Valentines Day holiday with all your single ladies than popping in your favorite trashy {or sappy} movie and lounging on the couch in yoga pants? What if I told you that adding a big bowl of popcorn, candy, and a MYO {make your own} hot cocoa bar would not only seal the deal with your gal pals but also be instagram worthy?! Sign. Me. Up. Am I Right? Let's dive right into the sugar coma I'm planning to have on Saturday night with my closest girlfriends, and you can too in just 5 easy steps!

Valentines Day DIY Hot Cocoa Bar

Step 1: Start with colored tissue paper or colored wrapping paper to create a table runner on your kitchen table. This will not only look cute and set the scene, but it's great for an easy cleanup!

Step 2: Fill your table by laying out your coffee mugs, apothecary jars, bowls, trays, etc. Any decorative or kitchen items that you will be using to hold your food, candy and popcorn! This will help you organize where you want everything to go first {so theres no food mess before you dig in}
Valentines Day DIY Hot Cocoa Bar

Step 3: Put your party favors or individual candy bags on a tray {shown} in a nice display. I like them near the mugs so your guests can grab one as they go and don't forget or get distracted by the MYO hot cocoa.
Valentines Day DIY Hot Cocoa Bar

Step 4: Fill your containers with all of your hot cocoa candy and ingredients {coconut, chocolate chips, peppermint, marshmellows, etc.} Don't forget to fill your largest container with popcorn! I love the look of the popcorn in a tall apothecary jar {shown} or vase! I also grabbed some small paper bags from the craft store and filled them with extra popcorn for individual portions!
Valentines Day DIY Hot Cocoa Bar

Step 5: Don't forget to set out your pretty napkins & Enjoy!

Check out a few of my favorite items below to re-create this Galentines Day Hot Cocoa Bar for your friends!

Valentines Day DIY Hot Cocoa Bar

Wednesday, December 31, 2014

5 Last Minute NYE Party Ideas


Happy New Years Eve! WOW, it's the last day of 2014 - can you believe it? Where has the time gone? I feel like just yesterday I was reminiscing on how amazing 2013 was for me and now it's time to do it all over again! Here are a few of my favorite last minute ways to ring in the new year! They're all super easy and won't take too long to pull together {so they're perfect for those of you procrastinators like me} Until next year!

1. Add some confetti to the balloons before you fill them up with helium. They make for a festive special touch and would even be fun to pop with friends and family when the clock hits midnight!

2. Top champagne glasses with fortune cookies. This is a quick and easy way to add some fun to your bubbly. Stop by your local Chinese take out and grab a handful to open after a toast to the new year!

3. Fill martini glasses with store bought cupcakes. And then tell your friends how you slaved over them for hours! Only kidding! When you're in a crunch and don't have enough time to bake up some treats, this is a great way to hide the store bought packaging and create a decorative display. {Also great for individual portions so guests can stand and mingle while indulging in sweet treats}

4. Don't forget the party hats! Spice up those plain old party hats with some sparkly scrapbook paper and some left over tinsel from the Christmas tree and you've got yourself a party. You could even set out all the paper, tinsel and other supplies and create a "make your own party hat" table if you're cutting it close on time. {tutorial included}

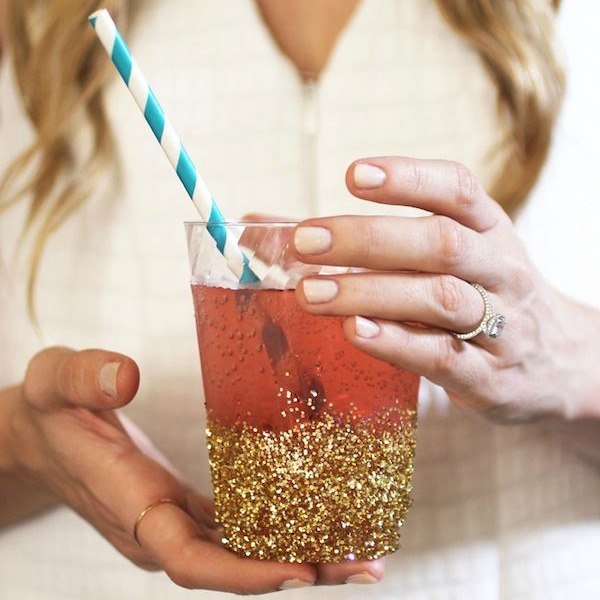
5. DIY Glitter cups. This one is probably my favorite, and it could get messy... but how cute are these and who doesn't love glitter? Grab some plain plastic party cups, some mod podge and glitter from the craft store and make sure to let them set for a few hours before you pop open the bubbly. {tutorial included}

Wednesday, December 3, 2014

9 Ways to Use Metallic This Christmas

ways to use metallic decor for the holidays - christmas

It's that time of year again! The holidays are here... I know I said that last week {and probably the week before} but they are really here now! Thanksgiving was a much needed time for relaxing and spending some quality time with family and now December is here and it's time to decorate! And what more do I love than to decorate. I'm so excited to have my own christmas tree this year, posts on that and all of the fun things I'm planning for the holidays will be up soon! But for now, how about a few ideas on how to use metallics in your home this Christmas/ Holiday season? Here are 9 great ways to use metallic this year:

1. Prop Gifts - Don't leave the underneath of your tree bare until Santa comes to town, wrap a few unwanted boxes with some pretty metallic paper and ribbon and set them right underneath the beautiful tree for display.

2. Table Settings - Having the table set nicely isn't only for fancy dinners and get-togethers. Set a few place settings for some  added decoration in the dining room or kitchen and add some metallic chargers or ribbon around the plates.

3. Pinecones - Pinecones are easy to find up and down the holiday aisles this time of year. Grab a can of metallic spray paint and you could use a handful these in a vase for display or string them to some twine for a garland.

4. Candleholders - Candleholders are easy to find especially when they don't need to be a specific material or color. Spray painting different shapes and sizes will bring in the metallic and bring in a unique touch to your holiday decor. Add different size white candles to each for added contrast. {See here, here, and here}

5. Ornament Displays - Mixed metallic ornaments or ornaments that are spray painted metallic colors - doesn't matter which. Lay them out randomly in a tray or vases to put on display. This would be great for a coffee table or dining table.

6. Wreath - The easiest way to bring metallics into a wreath during the holidays would be with ornaments. You can add them to a traditional wreath with greenery or create a handmade ornament wreath if you're up to the task! {super easy tutorial here}

7. Tree Ornaments - Add some metallic ornaments to your Christmas tree this holiday. This is a little more of a traditional approach but still brings that metallic splash into your home!

8. Stockings - Stockings come in all different colors materials and sizes now. Whether you want to branch out from the traditional red and white and get creative or just add a metallic monogram to it - this is another easy way to add some metallic to your space.

9. Votive Centerpiece - Like the candleholders, you can find an arrangement of votives that are already metallic and scatter them across a table as a centerpiece or find a random variety of glasses and glass vases and spray paint them metallic to all match. Tea light candles are easy to find (and buy in bulk) so you can spend a little more on the glasses and create a fun spread.

Tuesday, November 25, 2014

Get the Look

thanksgiving table setting
via Apartment34

Who's ready for Thanksgiving!? I know I am! I'll be heading a little north to the DC area to spend this holiday with my family! I can't wait to see everyone and celebrate the time we have to spend together. Even though I'll be away from my home this holiday, I'll be dreaming of this table top in my sleep... isn't it just so perfect? I know we're getting down to the wire here on the Thanksgiving deadline but if you are a last minute guru like I am, then now is your chance! Gather your shopping list from all of the shoppable links below and head on over to your local Target & West Elm to snag up the prettiest tabletop for Thanksgiving dinner! Dress your tabletop to impress!
thanksgiving table setting items


Shop the look:


Friday, November 7, 2014

5 Fall DIY's

easy fall DIY projects

Happy Friday! The weather is getting colder, Sundays are soon to be spent curled up on the couch watching movies with friends instead of sitting on patios enjoying the warm weather.  Let's embrace the sun setting early and the leaves falling to the ground by spending those chilly days inside doing a few DIY's. One more thing... Most of these DIY's would also make great gifts for the holidays!

1. Gold Leaf Bowls - These beauties will bring back those middle school art days with a little bit of paper mach and a whole lot of gold leaf! Great for holding jewelry!
2. Chai Candles - Hostess gifts, dinner party favors, or even just for yourself around the house.. bring that Starbucks chai tea into the home this winter season!
3. Gold Initial Ornament - You cannot go wrong with a little gold leaf this season. Or a lot, your choice. Personalize your christmas tree with these pretty little things or give one as a winter house warming gift!!
4. Watercolor Mugs - These mugs. oh my. They're so easy I want to make them in stock and send one to every single one of my friends! They're soooo adorable I just can't handle them!
5. Polka Dot Napkins - I know, I know, enough with the gold. I'm sorry! But how perfect are these DIY napkins. You could also turn these into placemats for an adorable table setting that could double into New Years Eve!

Which one of these will you be gifting this year?

Friday, October 17, 2014

6 Steps to Staging a Coffee Table

6 steps to styling a coffee table tray
Photos: Andi Perullo
I'm so excited to finally be sharing this with you all! Last week, I had the chance to hang out at the West Elm here in Charlotte and play around in the showroom styling things. To say I was like a kid in a candy shop is an understatement. Now, This {I think} is one of the easiest and most fool proof ways to decorate a coffee table to ensure it looks nicely put together. Good thing is... most of these items you may already have - but if not, they are very easy to find!

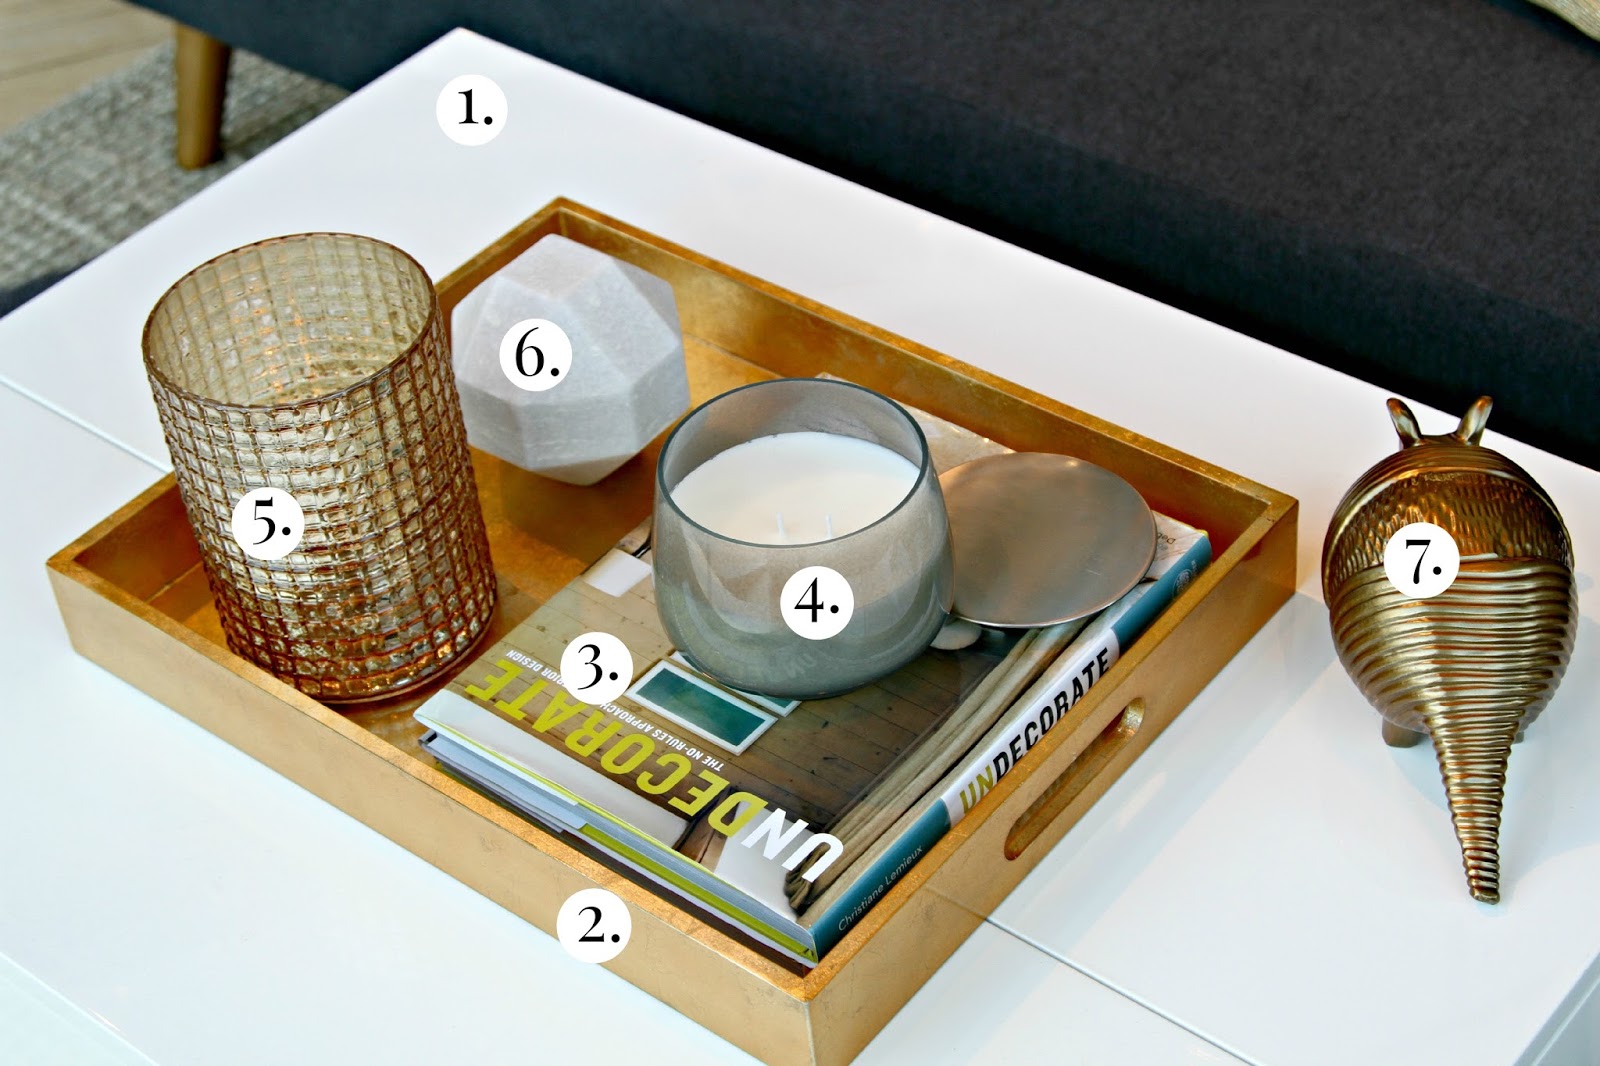
First things first, You're going to need about 7 items. Why am I calling it the 6 Steps to styling a coffee table?? Well, that's simply because I'm going to assume most of you already have #1 covered. Whether it's grandmas old wooden coffee table, or it's this storage friendly coffee table from West Elm {pictured} Any coffee table will do!

1. Coffee Table: West Elm {similar}
2. Tray: West Elm {similar, similar, similar}
3. Stack of Books: {see here}
4. Candle: West Elm {love these}
5. Vase or Candle Hurricane: West Elm {love these}
6. Decorative Item: West Elm {love these}
7. Decorative Item: West Elm {Rhino, Reindeer}
6 steps to styling a coffee table tray


6 steps to styling a coffee table tray
Start with the tray, place it smack dab in the center of the coffee table.

6 steps to styling a coffee table tray
Add your stack of coffee table books or magazines to one side of the tray.

6 steps to styling a coffee table tray
Top your stack of books with your favorite candle. Feel free to take the top off for added flair.

6 steps to styling a coffee table tray
Place your hurricane or vase in the back corner of the open side of the tray. Making sure your vase is just a little bit taller than where the candle sits is key to create a landscape within your tray.

6 steps to styling a coffee table tray
Huge thanks to West Elm Charlotte for having me!
Add your smallest decorative object in front of the hurricane. Add an extra decorative object on the edge of your coffee table to give the eyes a path on and off the coffee table. This armadillo was my favorite little object in the store, I just had to include it! Brass animals are so popular and trendy right now, check out this rhino or these reindeer.


What's the verdict? Seems easy enough, right?? Do you think you can pull something like this off?

Wednesday, October 1, 2014

Rugs Under $200

Rugs under $200


One thing every living room needs besides the obvious....sofa, tv, coffee table, etc.? If you're asking me, add a colorful or geometric area rug to that space and make it something to talk about! Check out this video below from Emily Henderson on how to choose the perfect size rug for your room and you'll be in business in no time!


Shop These Rugs:


Check out these other rugs I'm loving currently: